Monday, March 25, 2019

Mixed Media Monday 6

Hello! Monday again, hope you had a nice weekend.
The project today is also a Finish it Friday project, but I thought id use it today.
The triple panel is a gel plate pull using paint and then ink with some mdf cogs.
Die cut cogs and swirls would go well I thought...
Maybe a bit of paper weaving...

And a little stamped sentiment!

I really should get my gel plate out more often.

Hope you like it!
Come back tomorrow for a very clean Groovi project.

Maria x

Sunday, March 24, 2019

Speed Craft Sunday 10

Morning! Only just, I know, I had a nice sedate pace this morning, tired after telly!
So while still in my pjs I spent 12 minutes at my desk...

I stamped the entwined hummingbirds in Cornflower archival ink and covered the circles with masks, luckily they are the perfect size for the woodware 2 inch punch, so no cutting involved.


I then inked up the script stamp from the Journal set, Buttercup archival all over then Sap Green just around the edges. Stamp it across the middle.

Stamp again, above and below. Sponge a little yellow ink around the circle masks. I pondered putting the yellow into the circles instead but that would have involved cutting an aperture mask-not gonna do that when my lovely hubby is cooking my breakfast downstairs, Im starvin!
Hope you like!
I havent linked to anything, breakfast is ready, but everything is on the Clarity website, not my breakfast though, thats mine.

Thanks for popping in!

Maria x

Saturday, March 23, 2019

Stencil Saturday double bill.

Good Morning!
Early start for me, have to be up and out of my hotel by 6.30 to get back to Hochanda for 7am.
Groovi one day special shows are at 9am, 1pm and 5pm.

So I better show you some stencilly fun quickly...


This was piece number one, I utilised a piece of card I had die cut a picot oval from, I stencilled Leonie's cool Arrow stencil down the side just using Artistry ink pads, and then added some splashes. Then I stencilled the Natural Beauty stencil on another piece of card so the ladies face peeped through the oval aperture.

Then there was the matter of cleaning the inky stencil...

Well I don't do cleaning if I can help it, so I just spritzed the stencil with water and rubbed it on another piece of card, how nice is that!

That's it for today, thanks for popping in, see you tomorrow for Speed Craft Sunday?

Maria x

Friday, March 22, 2019

Finish it Friday 12

Friday again!
So after a quick dig in the box of heartbreak, I found these bits...

Both are Gel Plate bits with ink, the square one has been unloved for about 3 years approx, I remember trying to achieve a snowy look, which I managed, so this must have been a spare. The round piece was a demo piece from a gel plate class, I used the clean Leafy Swirl stamp to remove colour from the gel plate for a ghostly look, seems to be a ghost theme on my blog this week!

These bits really did not need much doing to them, so I just die cut a lovely Fresh Cut die to match the swirl and bingo!


Ooh that's quite a good pic for me!

Hope you like!
Gotta go pack and jump in the car now, I'm on Hochanda launching a One Day Special at 6pm tonight, maybe you can tune in?

Maria x

Wednesday, March 20, 2019

A stencil ghost?

Hello! Blimey I never blog on a Wednesday usually, but I spotted the March challenge over at CAS Stencil challenge blog, the theme is Ghosting, and I knew straight away exactly what I wanted to do for that.


The ghosting effect was created by applying versamark ink through the Damask Rose stencil onto Clarity Coated card, then I brayered over with Artistry inks to reveal the ghostly resist!

Then I did all my stamping with the Art Nouveau stamps and added a touch of coluring.

Do pop over and check the challengo blog out, they have some great themes.

Thanks for popping in!

Maria x

Tuesday, March 19, 2019

Groovi Tuesday 9

Good Morning, thanks for popping in.
My project today is a 'white' piece, no colouring in.
I used Linda's Butterfly plate
Time was not my friend when using this beautiful plate, so I just did a single layer piece. I also used one of the new Pergamano tools, the semi star tool is used around the ribboned band,then I embossed around the perforations. I'm not very confident with the new tools yet-remember i'm not a traditional parcher, so much practice needed, and more hours in the day!

That's all for today, hope to see you soon!

Maria x


Monday, March 18, 2019

Mixed Media Monday. Deal me in!!!

Afternoon, thanks for popping in!

Something new to me today.
Some of you know I play Poker regularly, I don't smoke cigars and drink Bourbon while playing though lol.
Anyway, we get new cards each season, and the old ones, which are made of plastic, end up in the bin, but last night I swiftly intercepted and salvaged the old cards when it dawned on me that they are the same size as ATC's! I love a bit of recycling.
So I raided my scrap box (twice in a week, I know right?)


I had a great time making these, it gives me a lot of pleasure to save something from landfill, yep i'm a bit of an eco geek. 
I just stuck my scrap backgrounds onto the playing cards and trimmed. And went from there.
This one is an ancient jelly plate painty scrap, and a couple of trees embossed with distress powder and cut out, then I added a tiny bit of stamped inca gold, it looks much brighter in the flesh.

This one was a tag background that I did a paint/ink resist, then added background stamping and added the little tag with the fob watch and key, little bit of inca gold in a couple of places, glossy accents to the watch face, done!

And Iv'e added my name to the back so you can still see its a recycled card, I think that will be my new ATC signature lol.

That's all for now, I have to get back to my desk and finish 3 more of these to send off to my swap partner for March. Then I have some actual work to do.

Maria x

Sunday, March 17, 2019

Speed Craft Sunday 9

Good Morning!
Very quick post again. I have a very full Groovi class today, but just enough time to show you my speedy creation...


I used the circle stain stamp from the Journal set with 3 colours of archival ink, 1st 2nd and 3rd generation ink for each.
Then I added bits of the harlequin stamp in yellow, and then the script stamp in grey.
Finally the butterfly and dragonflies and some splashes.
I decided not to put a sentiment on, I like it just as it is.
Time to create, about 15 minutes including cutting the extra butterfly.
Hope you like!

Maria x

Saturday, March 16, 2019

Stencil Saturday, Pan Pastel

Hello, thanks for popping in!
I thought id show you a stencil project using the new stencils that Barbara demonstrated on Hochanda on Thursday.

Just so you know, the little white dots are actually a reflection of the lcd lights on my light tent, No matter what I tried I couldnt get a pic without them because of the acetate on the card.


I started by applying Pan Pastel to my cover my card, then I smeared Versamark on the stencil, lay it on the card and run through a die cutting machine, then rub the pastel sponge over the card again to bring out the line art.
Colour can then be removed with an eraser to give light and shade.
I then stamped a couple of Wee Folk and some birds on acetate, when the ink is dry the acetate can be wrapped around the card and secured at the back.


Ok, that's all for today, have a great Saturday!

Maria x

Friday, March 15, 2019

Finish it Friday 11


Happy almost afternoon!
Nope I haven't only just got out of bed, iv'e been busy, honest.
Friday then, when I trawl through the mountain of unloved, forgotten, rejected and generally abandoned pieces in my workroom.

I thought id show you two projects today, because the first one was already not needing much to finish it, it had already started out as a mop up piece then I added some stencilling, then for some reason just flung it back in the box.

See what I mean?
I paired it up with an inky mop up that id stamped a butterfly on.

Bit of shimmer on the butterfly and a sentiment...
Done! I really like this one.
The stencil is called Floral Heart.

The next project matches quite nicely I think...
More orange, my favourite! And more inky butterflies.
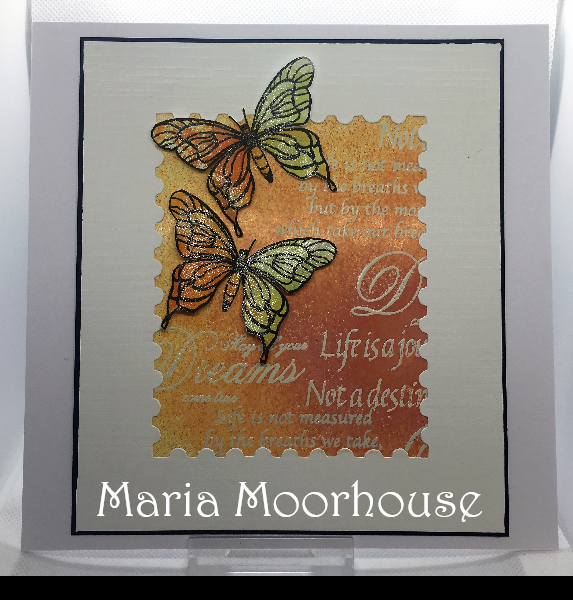
The waste from a big Sizzix postage stamp die cut, and a piece with heat embossed sentiments sprayed with inks for a resist, that has been in the box forever!


I really didn't know what to do with the resist piece for so long, but I got there in the end, and I love this!
When I create the cards from my F.I.F box, I make them just for pleasure, no deadlines, no work projects intended (although there's been a handful that iv'e considered for class), just pleasure, and then I find I don't want to part with them, but do give them away to nice people who I like!

Hope you like! Now go raid your scraps and make something cool, just for pleasure.

Thanks for stopping by, hope you can come back tomorrow for Stencil Saturday.

Maria x

Tuesday, March 12, 2019

Groovi Tuesday 8

Hello! Bit late on parade today, needed to finish off my prep for telly tomorrow and pack everything i need.
So quick Groovi post, so i can go get a cuppa and wash my hair-not at the same time...

I used the Dragon plate first, then added the landscape bits behind.
This is the first time iv'e used that particular backing paper from the Northern Lights pad, so I was very happy it worked well, nice and bright.

The red in the sky was a happy (ish) accident, I was blending the blue sky with Dorso Oil on tissue and managed to smear a bit from one of the dragon wings, can you see it at the tip of the wing? so I added some more red to make it look like it was deliberate, I think its called blagging it...
I think this would be a good one for a child as its bright and colourful.

Thanks for popping in!
Maybe you can watch my telly shows on Hochanda tomorrow, 12 noon and 4pm.

Maria x

Monday, March 11, 2019

Another Mixed Media Monday

Good Morning, hope you had a nice weekend and are ready to tackle a new week!
TV prep for me today and tomorrow, ready for Wednesday, but before I get started I'll blog...

I did this canvas using the lovely frameless Garden Heart stencil with Grunge paste.
Painted over with black paint when dry, then quite carefully added watery Inca Gold in all the little crevices of the design. Dry brushed a little Inca over the edges.
The sentiment is stamped onto some scraps of brown cotton using Archival ink, actually I stamped direct onto the canvas first but it didn't go so well, so a cover up job was needed!
Finally mounted onto a 8 inch white canvas, done!

Thanks for stopping by, hope you can come back tomorrow for some Grooviness.

Maria x

Sunday, March 10, 2019

Speed Craft Sunday 8

Good Afternoon, thanks for popping in for another speedy project, today,s is super speedy, I created it whilst peeling veg for the roast dinner and cooking fry up for brekky, even with my dodgy arm I can still multi task!

So here's what I made...
I didn't have time to take pics along the way, I just had to go for it.
I started with a torn piece of paper, brushed yellow ink along from the paper, then added black to the edges. 
Then to add the stamps, and here's a confession...
I cut the stem off one of my Alium stamps, so that I can make the flower lean either left or right.


The same stem has a chunk missing from it, no idea how it got damaged, but to be fair it's years old, and I could just fill in with a pen, but on this occasion I thought i'd use the gap for the crossover of stems.
And just to finish off, I added a yellow shadow!
Done in about 8 minutes.

Hope you like!

Have a lovely Sunday.

Maria x

Friday, March 8, 2019

Finish it Friday 10

Its Friday again, so you know what that means right? Time to rummage amongst the mountainous pile of rejected, neglected and forgotten bits bobs and unfinished crafty projects!

 So this is what I started with...

A background using the Mountain Ash stencil, masked so the middle is left empty.
A stamped panel, now I remember this, I was playing around trying to work out what I was doing for one of the New Design Club stamps (The little lillies that are upside down in a vase) I decided not to incorporate the larger lillies, but i'd already stamped and coloured them, so in the reject box it went!

And with the little die cut frame, I thought these pieces were made for each other.
The only problem is my composition, do I want to be all neat and symmetrical....


Or do I want to be all rebellious and jaunty...

Can you guess which way I jumped?? Can ya? hmm?
Whether you are a conformist or a rule breaker, I hope you like it!

Thanks for popping in, have a great weekend.

Maria x

Tuesday, March 5, 2019

Groovi Tuesday 7

Hello, thanks for popping in for Groovi Tuesday.

I thought I would show you one of my samples using the brand new lace grids.


This one is George. The rose is from Jayne's Roses, I wanted it all peachy coloured, my favourite!
Lots of work in this, I don't work fast with lace work but I love it.
 Lace work wasnt particularly one of the techniques I was trying to learn when I had the idea for the Groovi system back in September 2014, I just envisioned beautiful line art etched on acrylic plates to make the tracing part achievable, so its lovely to see how everything has blossomed and developed since Clarity launched my lightbulb moment in 2015.

Thanks again for popping in!

Maria x

Monday, March 4, 2019

Mixed Media Monday 3

Good Morning!
Hope you had a great weekend, mine was busy busy busy, but good, sadly I didn't manage a Speed Craft Sunday yesterday, i came home from Shrewsbury, went for a wee (Too much info?) then i made my slimming world gravy still wearing my coat, then went to Pete's mums for pork dinner, then went straight to poker, where I kicked ass and won!

So today then, Mixed Media Monday...

 I absolutely loved the Natural Beauty stencil that Leonie designed.
I used some rather nice sage green texture paste on a canvas, I deliberately left the edges for a tatty look. When the paste was dry I added Aged Parchment ink over the exposed areas and edged with brown archival ink.
Then I added a tough of inca gold and used a gold wink of stella pen in between the lines, you cant see the sparkle in the pics.

I tattied up a couple of chipboard shapes and added some handmade flowers, not too much faffing though, i wanted an uncluttered look for this one.

Hope you like!
Thanks for popping in, i'll be back tomorrow with Groovi Tuesday.

Maria x

Saturday, March 2, 2019

Stencil Saturday, a bit of graffiti...

Evening!
Busy day, but I wanted to something with stencils as its Saturday, and I spotted the new challenge over at Country View Challenges, the theme is Letters and/or Numbers.
I managed to work 3 stencils into this one.


I started by blending some yellow ink through the Harlequin stencil, I then bumped it along and added a little orange ink.


Then I roughly rubbed black ink over the new Arty Arrows stencil, sprayed with water and pressed it over the card.


Now for a very very cool stencil, ABC stencil, and some texture paste, you need to do one letter at a tie if you are making up a word, the good news is this paste can be dried with a heat gun in about a minute, I don't do waiting!

When its dry, brush over with black ink, I didn't particularly want the letters black, but a hazy shadow around the letters.

I then sanded the letters back a bit, decide to keep some of the black, and added red ink through the stencil. A little touch of white pen around the letters.


A few red splashes and edge with black sharpie pen to finish off and then bang it on a card!

OK, i'm happy that's done, i can go cook some tea now, thanks for popping in, and don't forget to pop over and have a look at the challenge, you have a whole month to enter.

Maria x


Friday, March 1, 2019

Finish it Friday 9

Good Morning and happy Friday!
The weeks are flying by aren't they, I cant believe its week 9 of FIF, so here it is...

This is what i started with
The motorbike is an older Clarity stamp, paper is from Paperartsy, and iv'e no idea where the embossing folder is from.

I die cut a nice big leafy sprig from an amazon package, If you have any of those and you get to see me in person, can I have them please?
I didn't want to do much to the motorbike, so i just used my sparkle pen with a tiny touch of brown ink.
The book page looks warped in the pic, only because the sparkle and ink is still wet.


That's it, done!

Thanks for popping in.
No idea if i'll manage a Stencil Saturday tomorrow or not, got a very busy day today and Shrewsbury tomorrow, but i'll definitely manage a Speed Craft Sunday.